If you’ve ever picked up a handheld laser welding machine, you know the feeling. It’s like holding the future in your hand—lightweight, fast, and incredibly powerful. But have you ever stopped to wonder what’s actually going on inside that sleek gun?
As engineers, we often get caught up in the specs—power output, duty cycles, and penetration depths. But for the operators on the floor, the laser welding gun is the tool they live with every day. Understanding its anatomy isn’t just academic; it’s the secret to getting better welds, extending your machine’s life, and troubleshooting issues before they become expensive repairs.
Today, I’m going to walk you through the structural components of a modern laser welding gun. We’ll break down the seven key components that make fiber laser welder technology so revolutionary.
1. Fiber Optic Connector (QBH/QCS): The Power Delivery Highway
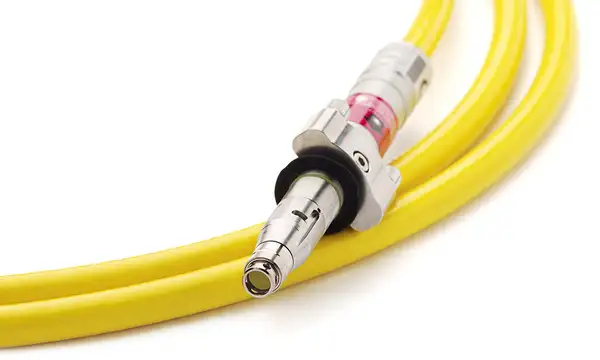
Everything starts here. The fiber optic connector is the bridge between your massive laser source and the delicate handheld gun. In the industry, we typically see two main types: the QBH (Quartz Block Head) and the QCS (Quartz Connector System).
Think of this connector as the heavy-duty fire hose coupling. Its job is to deliver high-power laser energy—often ranging from 1,000W to 3,000W—safely into the gun without leaking any radiation or burning up the connection.
- Why it matters to you:
- Safety Interlocks: These connectors have built-in safety loops. If the connector isn’t seated perfectly, the laser welding machine won’t fire. This prevents accidental exposure.
- Cooling is Key: At these power levels, heat is the enemy. The connector usually has active water cooling channels. If your connector gets hot to the touch, stop immediately—your water flow might be blocked.
Pro Tip: Never unplug the fiber connector in a dirty environment. Even a single speck of dust on the quartz block can burn instantly when the laser fires, destroying a component worth thousands of dollars.
2. Collimating Lens Assembly: Straightening the Beam
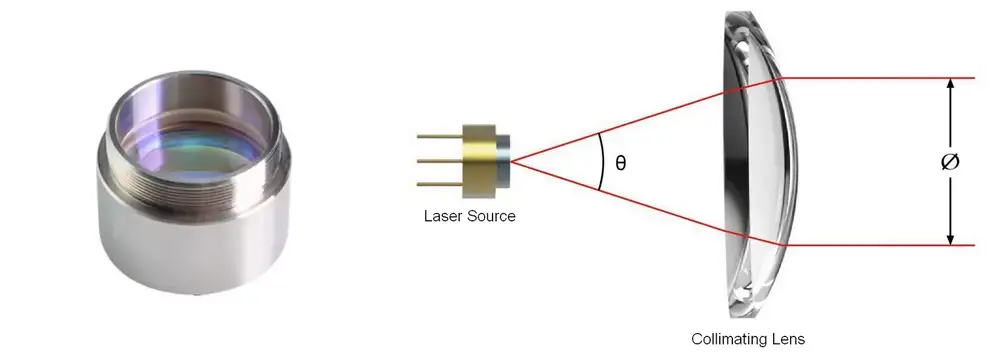
Once the laser light exits the fiber cable, it naturally wants to spread out, like water leaving a garden hose nozzle on the “spray” setting. This is where the collimating lens assembly steps in.
Located just after the fiber connector, this lens takes that divergent light and “straightens” it into a perfectly parallel column of light. It transforms the chaotic spread into a disciplined beam that can travel through the rest of the gun without hitting the inner walls.
- The Technical Role:
- It determines the beam diameter. A larger collimated beam allows for a finer focal spot later on.
- It often sits in a drawer-style mount, making it accessible for service, though you rarely need to touch it.
If your laser welding gun starts feeling hot in the middle section, it’s often a sign that the collimating lens is dirty or misaligned, causing the laser to clip the internal metal parts instead of passing through cleanly.
3. Wobble Galvanometer Mechanism: The Secret to Perfect Welds
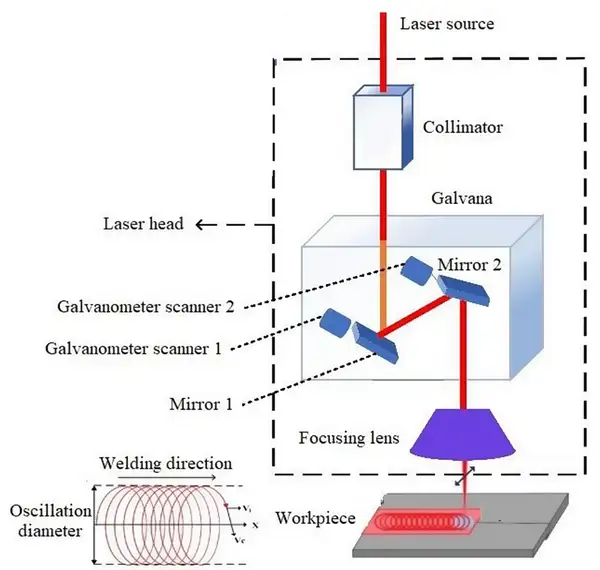
The wobble galvanometer mechanism consists of a set of motor-driven mirrors that oscillate the laser beam at incredibly high speeds. Instead of a static point of light, the beam “wobbles” or stirs the molten pool. This is one of the key reasons why handheld laser welding is superior to traditional TIG welding for beginners
- Why “Wobble” is a Game Changer:
- Bridging Gaps: A static laser beam is tiny (0.05mm). It falls right through gaps in fit-up. The wobble motor spins the beam in circles, figures-of-eight, or lines, effectively widening the beam to 4mm or 5mm. This lets you weld parts that aren’t perfectly fitted.
- Better Aesthetics: The stirring action helps release gas bubbles from the weld pool, reducing porosity and creating that smooth, “fish-scale” look without the manual weaving skill required in TIG.
- Material Versatility: It drastically improves results on reflective materials like aluminum and copper by stabilizing the keyhole.
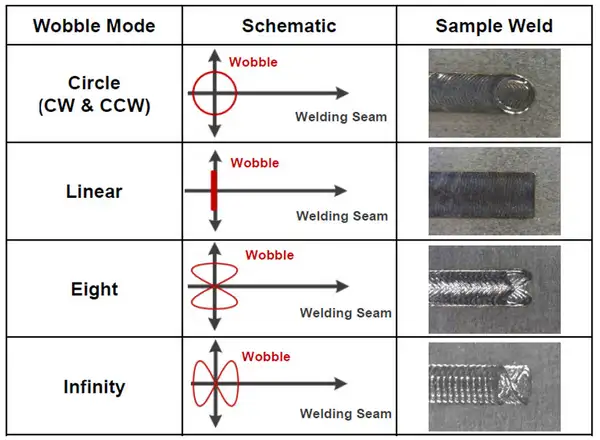
By adjusting the wobble frequency and width on your control panel, you are directly commanding these micro-motors to change how they paint with light. And different painting methods, or wobble mode, also produce different welding results.
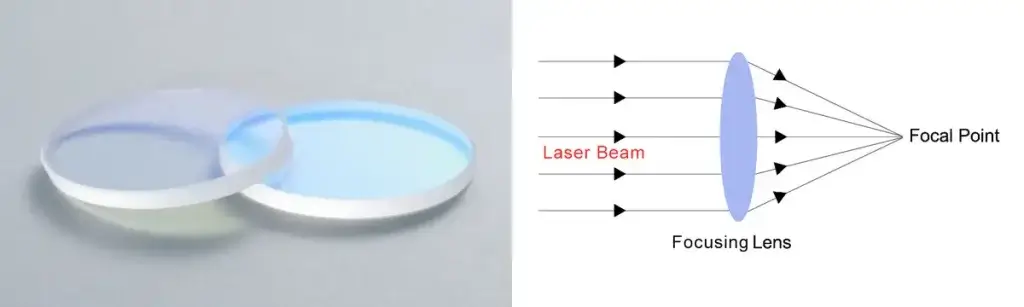
4. Focusing Lens Assembly: The Burning Point
After the beam has been straightened by the collimator and danced around by the galvanometer, it hits the focusing lens assembly.
This lens acts like a magnifying glass burning a leaf on a sunny day. It takes that parallel column of light and concentrates it down to a tiny, incredibly intense point—the focal point. This is where the energy density is high enough to melt metal instantly.
- Understanding Focal Length:
- Most handheld laser welders use a specific focal length (commonly F150 or F125).
- This defines your “sweet spot.” If you pull the gun too far back or push it too close, you lose that intensity.
- Unlike the collimator, this lens handles the full intensity of the focused beam, making it sensitive to thermal stress.
When you adjust the focus scale on the gun tube, you are mechanically moving this lens assembly back and forth to fine-tune exactly where that hot spot lands relative to your nozzle tip.
5. Protective Window Slide: The Sacrificial Shield
Welding is a dirty process. Sparks, metal spatter, and smoke are constantly flying back toward the gun. Without protection, that debris would hit the expensive focusing lens we just talked about. The protective window is a cheap, flat piece of glass coated to let laser light through while blocking physical debris.
- Maintenance Drill:
- Check it Daily: I cannot stress this enough. Pull the slide out before every shift.
- Look for Burn Spots: If you see tiny black dots or a cloudy film, clean it. If it doesn’t clean off, replace it immediately.
- The “Death Spiral”: A dirty window absorbs laser energy. This makes it get hot. The heat attracts more dust. Eventually, the glass cracks or burns through, destroying the focusing lens behind it. A $5 window saves a $500 lens.
Pro Tip: Buy laser protective lenses in bulk. Treating them as reusable when they are burnt is the number one cause of equipment failure I see in the field.
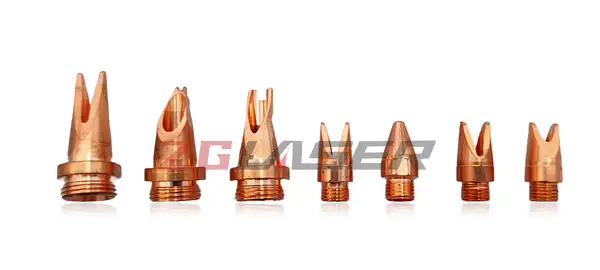
6. Welding Nozzle: The Fingertip of the Gun
The welding nozzle is the copper tip at the very front of the gun. It’s the only part that physically touches your workpiece. But it does more than just help you aim; it’s a critical part of the process.
- Functions:
- Gas Delivery: It directs the shielding gas (usually Argon or Nitrogen) around the weld pool to prevent oxidation/rust.
- Distance Control: Ideally, the nozzle length is calibrated so that when the nozzle touches the metal, the laser is perfectly in focus.
- Variety of Shapes:
- Internal Corner Nozzles: Great for fillet welds.
- External Corner Nozzles: Perfect for outside edges.
- Wire Feed Nozzles: These have a special hole to guide the filler wire directly into the melt pool.
Choosing the right nozzle is like choosing the right brush for a painting. Using a flat nozzle for a corner weld will result in poor gas coverage and ugly welds.
7. Trigger & Control PCB: The Brains in Your Hand
Finally, we have the user interface—the Trigger & Control PCB (Printed Circuit Board). While the heavy lifting of processing power happens in the main machine cabinet, the gun has its own electronic brain.
This board manages the signals between your finger and the laser source.
- Safety First: The trigger is rarely just a simple “on/off” switch. It usually requires a “safety ground” signal. The laser won’t fire unless the nozzle is touching the metal workpiece (completing the circuit) AND the trigger is pulled. This prevents you from accidentally firing the laser across the room.
- Ergonomics: The PCB is designed to fit into the handle, often offering a “double click” or mode switch button, allowing you to cycle through laser welding parameters without walking back to the main console.
This electronics package is potted and sealed to protect it from the industrial environment, but it’s still sensitive. Dropping the gun can crack the PCB, leading to intermittent firing issues. Treat your gun with the same respect you’d give a precision measuring tool.
Conclusion
The laser welding gun is a marvel of engineering, compacting advanced optics, precision mechanics, and high-power electronics into a package you can hold in one hand.
From the fiber optic connector delivering the raw power to the wobble galvanometer creating the perfect weave, every component plays a critical role. But remember, the most important variable in the equation is you, the operator.
By understanding how the collimating lens and focusing lens work together, and by staying disciplined with your protective window maintenance, you ensure that your handheld laser welding machine remains a reliable, profit-generating beast for years to come.
So, next time you swap out a nozzle or clean a lens, take a moment to appreciate the technology. And as always, keep those welds clean and your safety glasses on!
Finally, you can read my other article about handheld laser welding gun structure: The Power Behind the Gun: A Structural Breakdown of the Laser Welding Machine Cabinet
FAQ
To wrap things up, let’s tackle the most common questions I get on the shop floor. These are the quick-fire answers you need to keep your laser welding machine running smoothly and your operators happy.
Q1: How often should I change the protective window slide?
A: There is no set hour rating; it depends entirely on your workload and cleanliness.
- Visual Inspection is King:Pull the slide out before every shift. If you see a tiny black dot, clean it with alcohol and a dust-free wipe.
- When to Toss It:If the dot doesn’t wipe off, or if the glass looks “cloudy” (burnt coating), replace it immediately.
- The Risk:Welding with a dirty window causes heat buildup that can shatter the glass and ruin the expensive focusing lens assembly behind it.
Q2: Why is my gun getting hot during operation?
A: A quality handheld laser welding gun should stay relatively cool, thanks to active water cooling. If it’s getting hot to the touch:
- Check the Water Chiller:Ensure water is actually flowing to the gun.
- Check the Optics:90% of the time, heat means dirty optics. The laser energy is being absorbed by dirt on the collimating lens or protective window rather than passing through to the metal. Stop immediately and inspect the lenses.
Q3: Can I use a handheld laser welder for aluminum and copper?
A: Absolutely. In fact, this is where the wobble galvanometer mechanism shines.
- Reflectivity Issues:Highly reflective metals used to be hard to weld. The high energy density of the fiber laser overcomes this.
- Wobble Function:By stirring the beam, the wobble stabilizes the keyhole, preventing the defects and porosity common when TIG welding aluminum.
- Tip:You may need higher power settings (2000W+) for copper due to its extreme thermal conductivity.
Q4: My “red light” doesn’t match where the laser actually hits. What’s wrong?
A: The red pilot light is generated by a separate diode and aligned to run parallel with the main laser beam.
- Mechanical Shock:If the gun was dropped or banged against a table, the internal mirrors or the collimating lens assembly might have shifted.
- Calibration:Most laser welding machines have a software setting to electronically offset the red light to match the actual beam position (X/Y offset). Check your controller settings first.
Q5: Is the welding nozzle just a standard piece of copper?
A: Not quite. While it looks simple, the geometry is critical.
- Gas Flow:The nozzle is designed to ensure laminar gas flow. If you use a homemade or damaged nozzle, you might suck oxygen into the weld, causing soot and porosity.
- Wire Feeding:If you are using a wire feeder, you need a specific nozzle with a guide tube slot. Using a standard nozzle will result in the wire wandering off the weld seam.
Q6: Does the fiber optic connector ever need maintenance?
A: Do not touch it unless absolutely necessary.
- Sealed Environment:The QBH/QCS connector is designed to be plugged in once and left alone.
- Extreme Sensitivity:The quartz block is incredibly sensitive to dust. If you must unplug the gun from the source, cap both ends immediately. A single dust particle on the quartz block can explode when the high-power laser hits it, destroying the connector and potentially the source.